Get started with 1Password for SSH
You can use 1Password to generate an SSH key and autofill your public key to your favorite Git platform. Then, set up the 1Password SSH agent and configure your SSH or Git client so you can use the 1Password SSH agent to authenticate your Git and SSH workflow.
The following examples use GitHub to illustrate the SSH workflow from start to finish, but you can modify the steps to use with your favorite Git or cloud platform.
Requirements
- Mac
- Windows
- Linux
- Sign up for 1Password.
- Install and sign in to 1Password for Mac.
- Install the 1Password browser extension (optional).
Required to autofill SSH keys in your browser.
- Sign up for 1Password.
- Install and sign in to 1Password for Windows.
- Install the 1Password browser extension (optional).
Required to autofill SSH keys in your browser.
- Sign up for 1Password.
- Install and sign in to 1Password for Linux.
- Install the 1Password browser extension (optional).
Required to autofill SSH keys in your browser.
The 1Password SSH agent doesn't work with Flatpak or Snap Store installations of 1Password. To use the SSH agent, choose a different method to install 1Password for Linux.
For the best experience when using the 1Password SSH agent, you can configure Touch ID, Apple Watch, Windows Hello, or system authentication to unlock 1Password and authenticate SSH key requests.
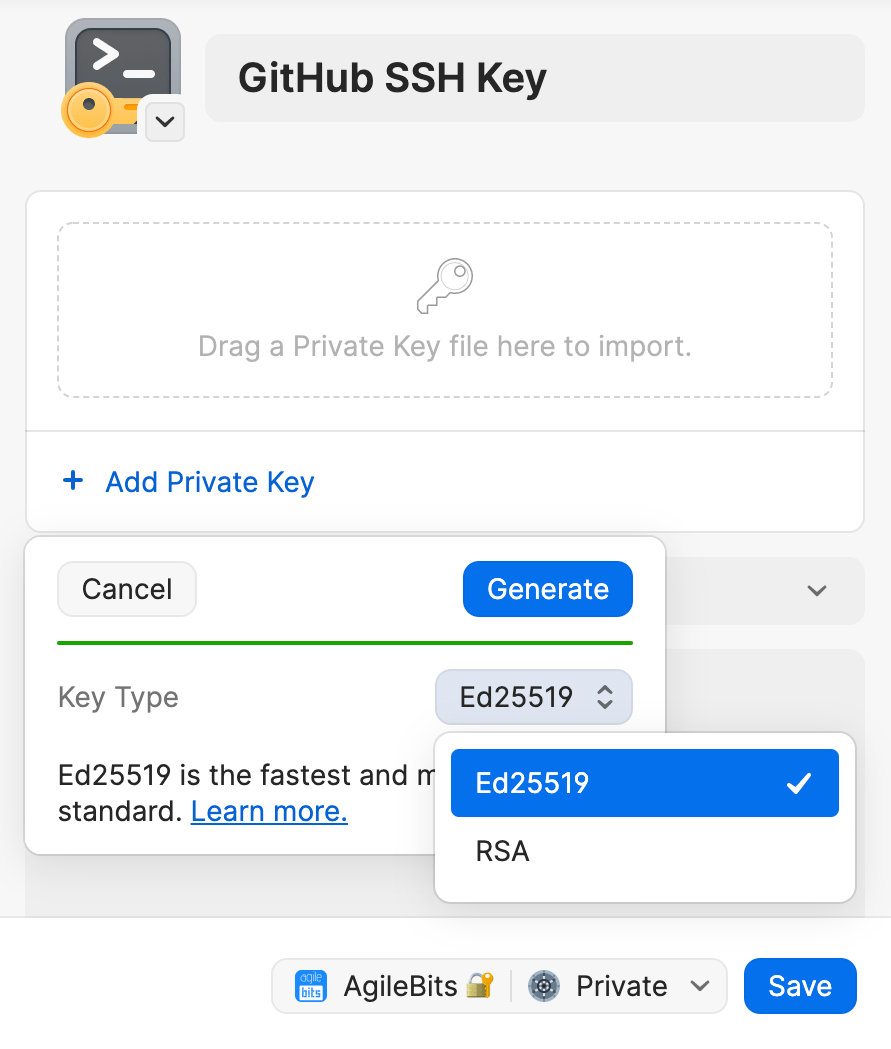
Step 1: Generate an SSH key
- Open and unlock the 1Password app, then navigate to your Personal, Private, or Employee vault. The name of this vault varies depending on your account type.
- Select New Item > SSH Key.
- Select Add Private Key > Generate New Key.
- Select an SSH key type: Ed25519 or RSA, then select Generate.
- When you're done, select Save.
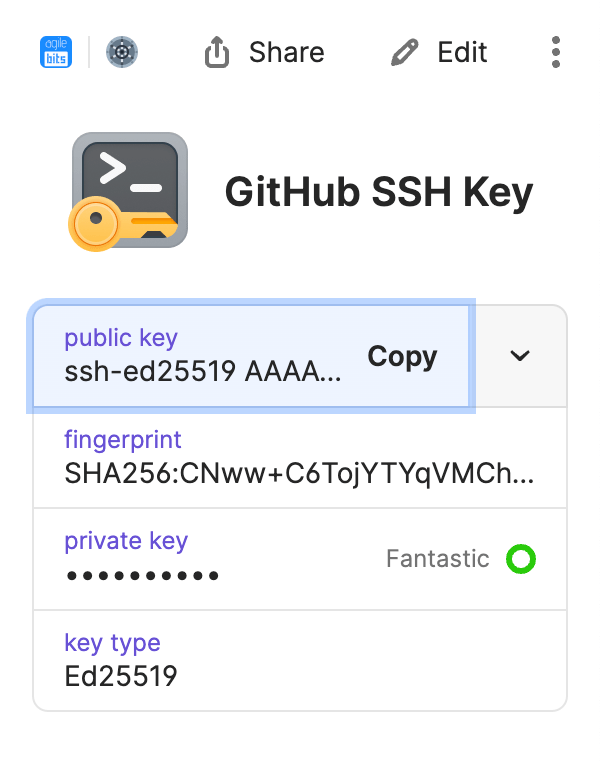
1Password will generate your SSH key, which includes the private key, public key, and its fingerprint.
Learn more about generating or importing SSH keys and which SSH keys you can use with the 1Password SSH agent.
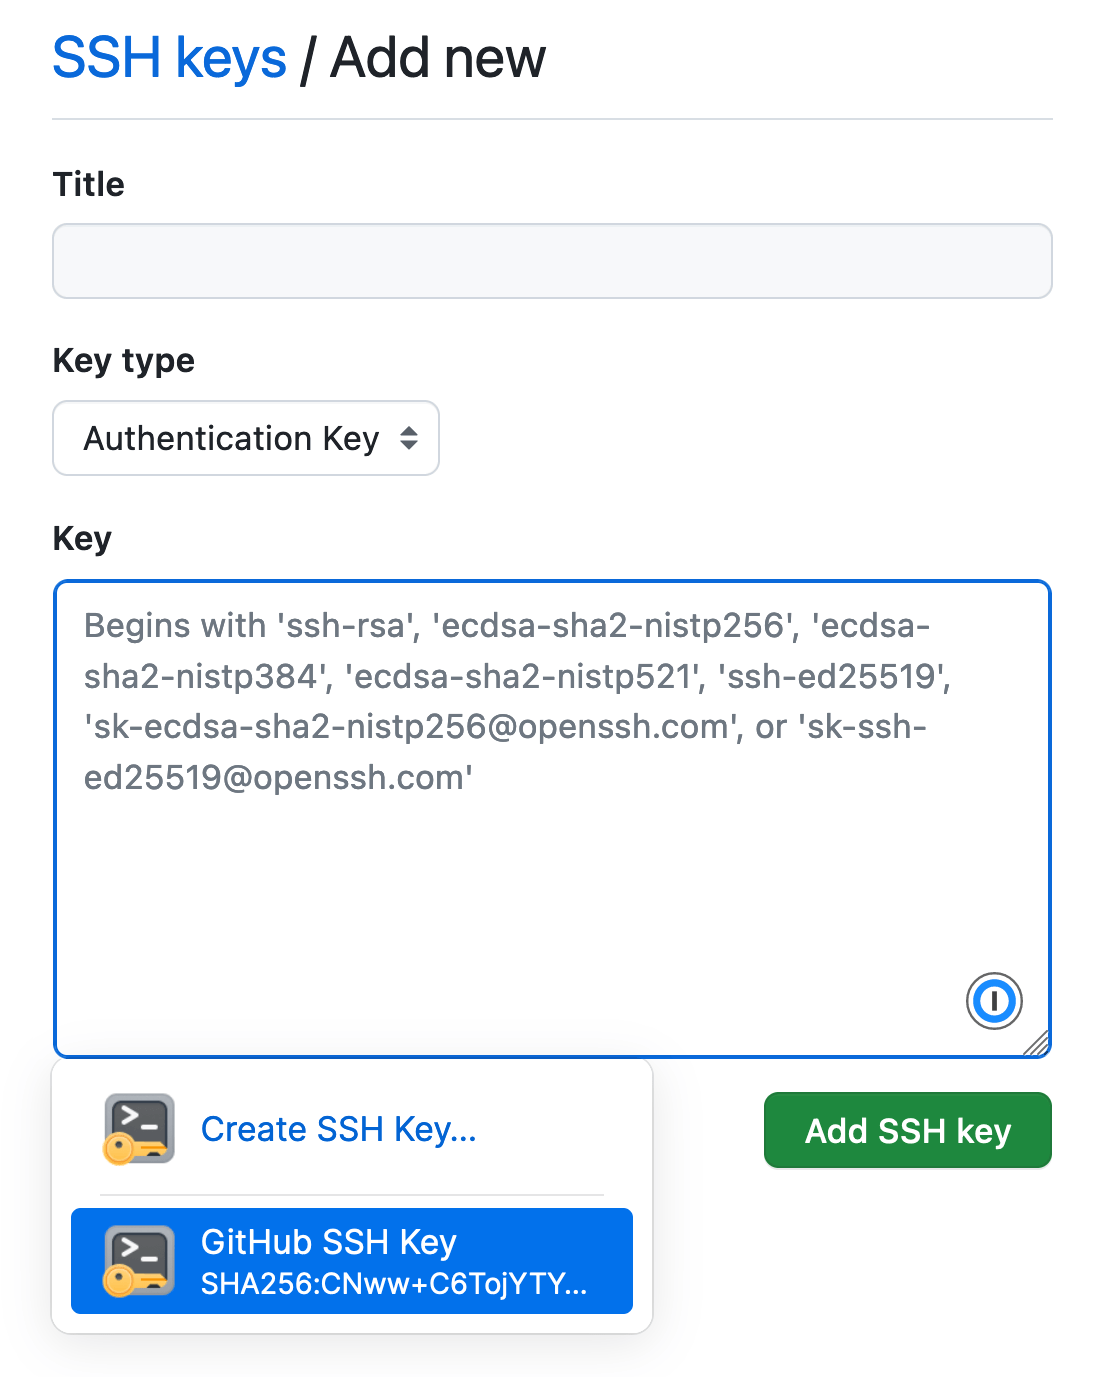
Step 2: Upload your public key
After you generate your SSH key, you can add the public key to your GitHub account. Visit the GitHub SSH key settings page upload your public key using the 1Password browser extension or desktop app.
- Browser extension
- Desktop apps
- Select the Title or Key field on the GitHub settings page. If 1Password doesn't show a list of suggested items, select the 1Password icon in the field.
- Select the GitHub SSH key you just created. 1Password will automatically fill the public key and title in the corresponding fields.
- Select Add SSH Key on the settings page to save the key in your GitHub account.
Your SSH key can now be used to authenticate with GitHub.
For examples using other Git or cloud platforms, see Autofill public keys.
- Navigate to the GitHub SSH key you just created in 1Password and select it.
- Copy your public key from the item details, then paste it into the Key field on the GitHub settings page.
You can also use Quick Access to find and copy your public key. - Then select Add SSH Key on the settings page to save the key in your GitHub account.
Your SSH key can now be used to authenticate with GitHub.
For examples using other Git or cloud platforms, see Autofill public keys.
Step 3: Turn on the 1Password SSH agent
The 1Password desktop app includes an SSH agent that, when turned on, runs in the background to handle authentication for your SSH clients.
Follow these steps to turn on the SSH agent:
- Mac
- Windows
- Linux
- Open the 1Password app and select 1Password > Settings from the menu bar, then select Developer.
- Select Set Up SSH Agent, then choose whether you want to display SSH key names when you authorize connections.
- (Optional) Adjust the authorization options for when and how often the SSH agent will ask you to approve SSH requests.
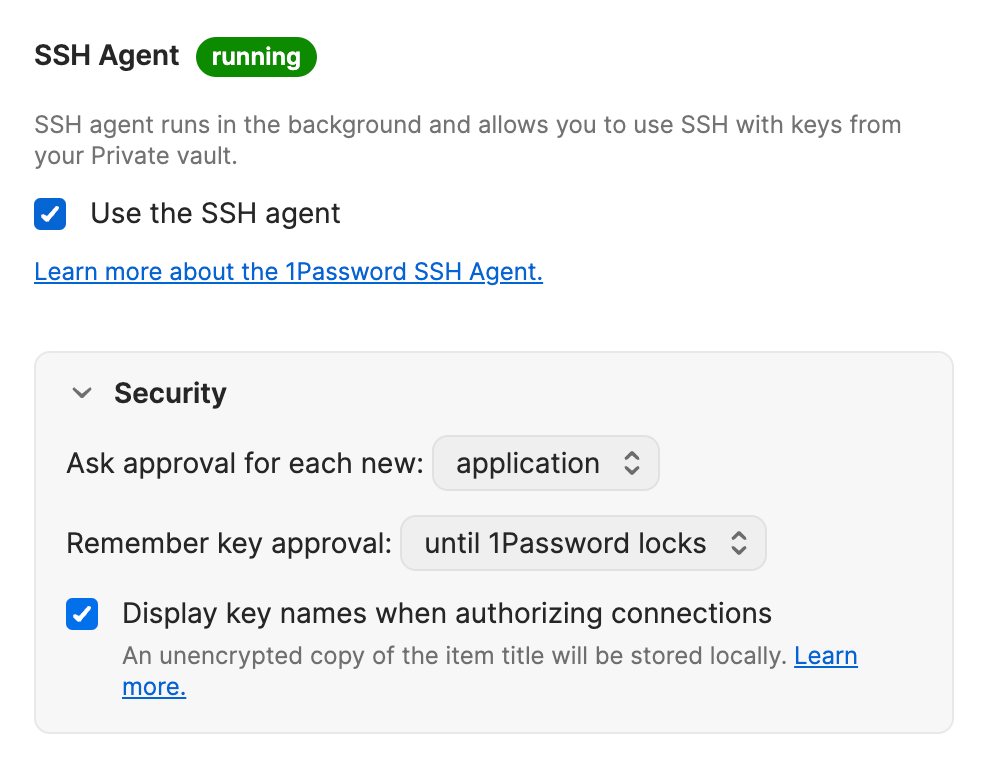
If you previously turned off the SSH agent and would like to turn it back on, select the checkbox to Use the SSH agent.
When you choose to display SSH key names when authorizing connections, it's easier for you to identify which key 1Password is requesting access to when authenticating a request from an SSH client. To display key names in authorization prompts, 1Password needs to save the titles of your SSH Key items in local storage. To turn off this feature, deselect the checkbox to Display key names when authorizing connections in the Security section.
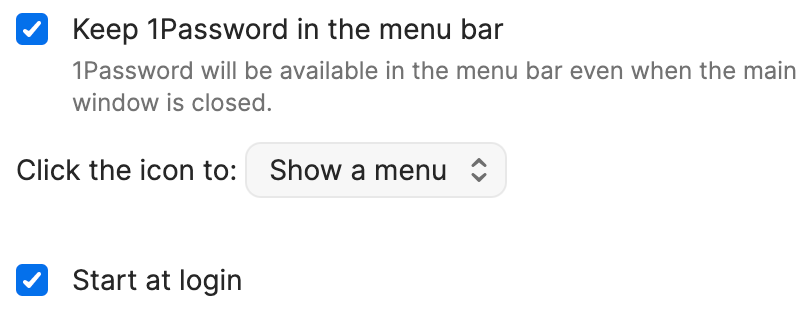
To make sure the SSH agent keeps running, even when the 1Password app is closed:
- Open the 1Password app and select 1Password > Settings from the menu bar, then select General.
- Select the checkboxes to Keep 1Password in the menu bar and Start at login.
The 1Password SSH agent only works with SSH clients that support Microsoft OpenSSH. For more information, see SSH client compatibility.
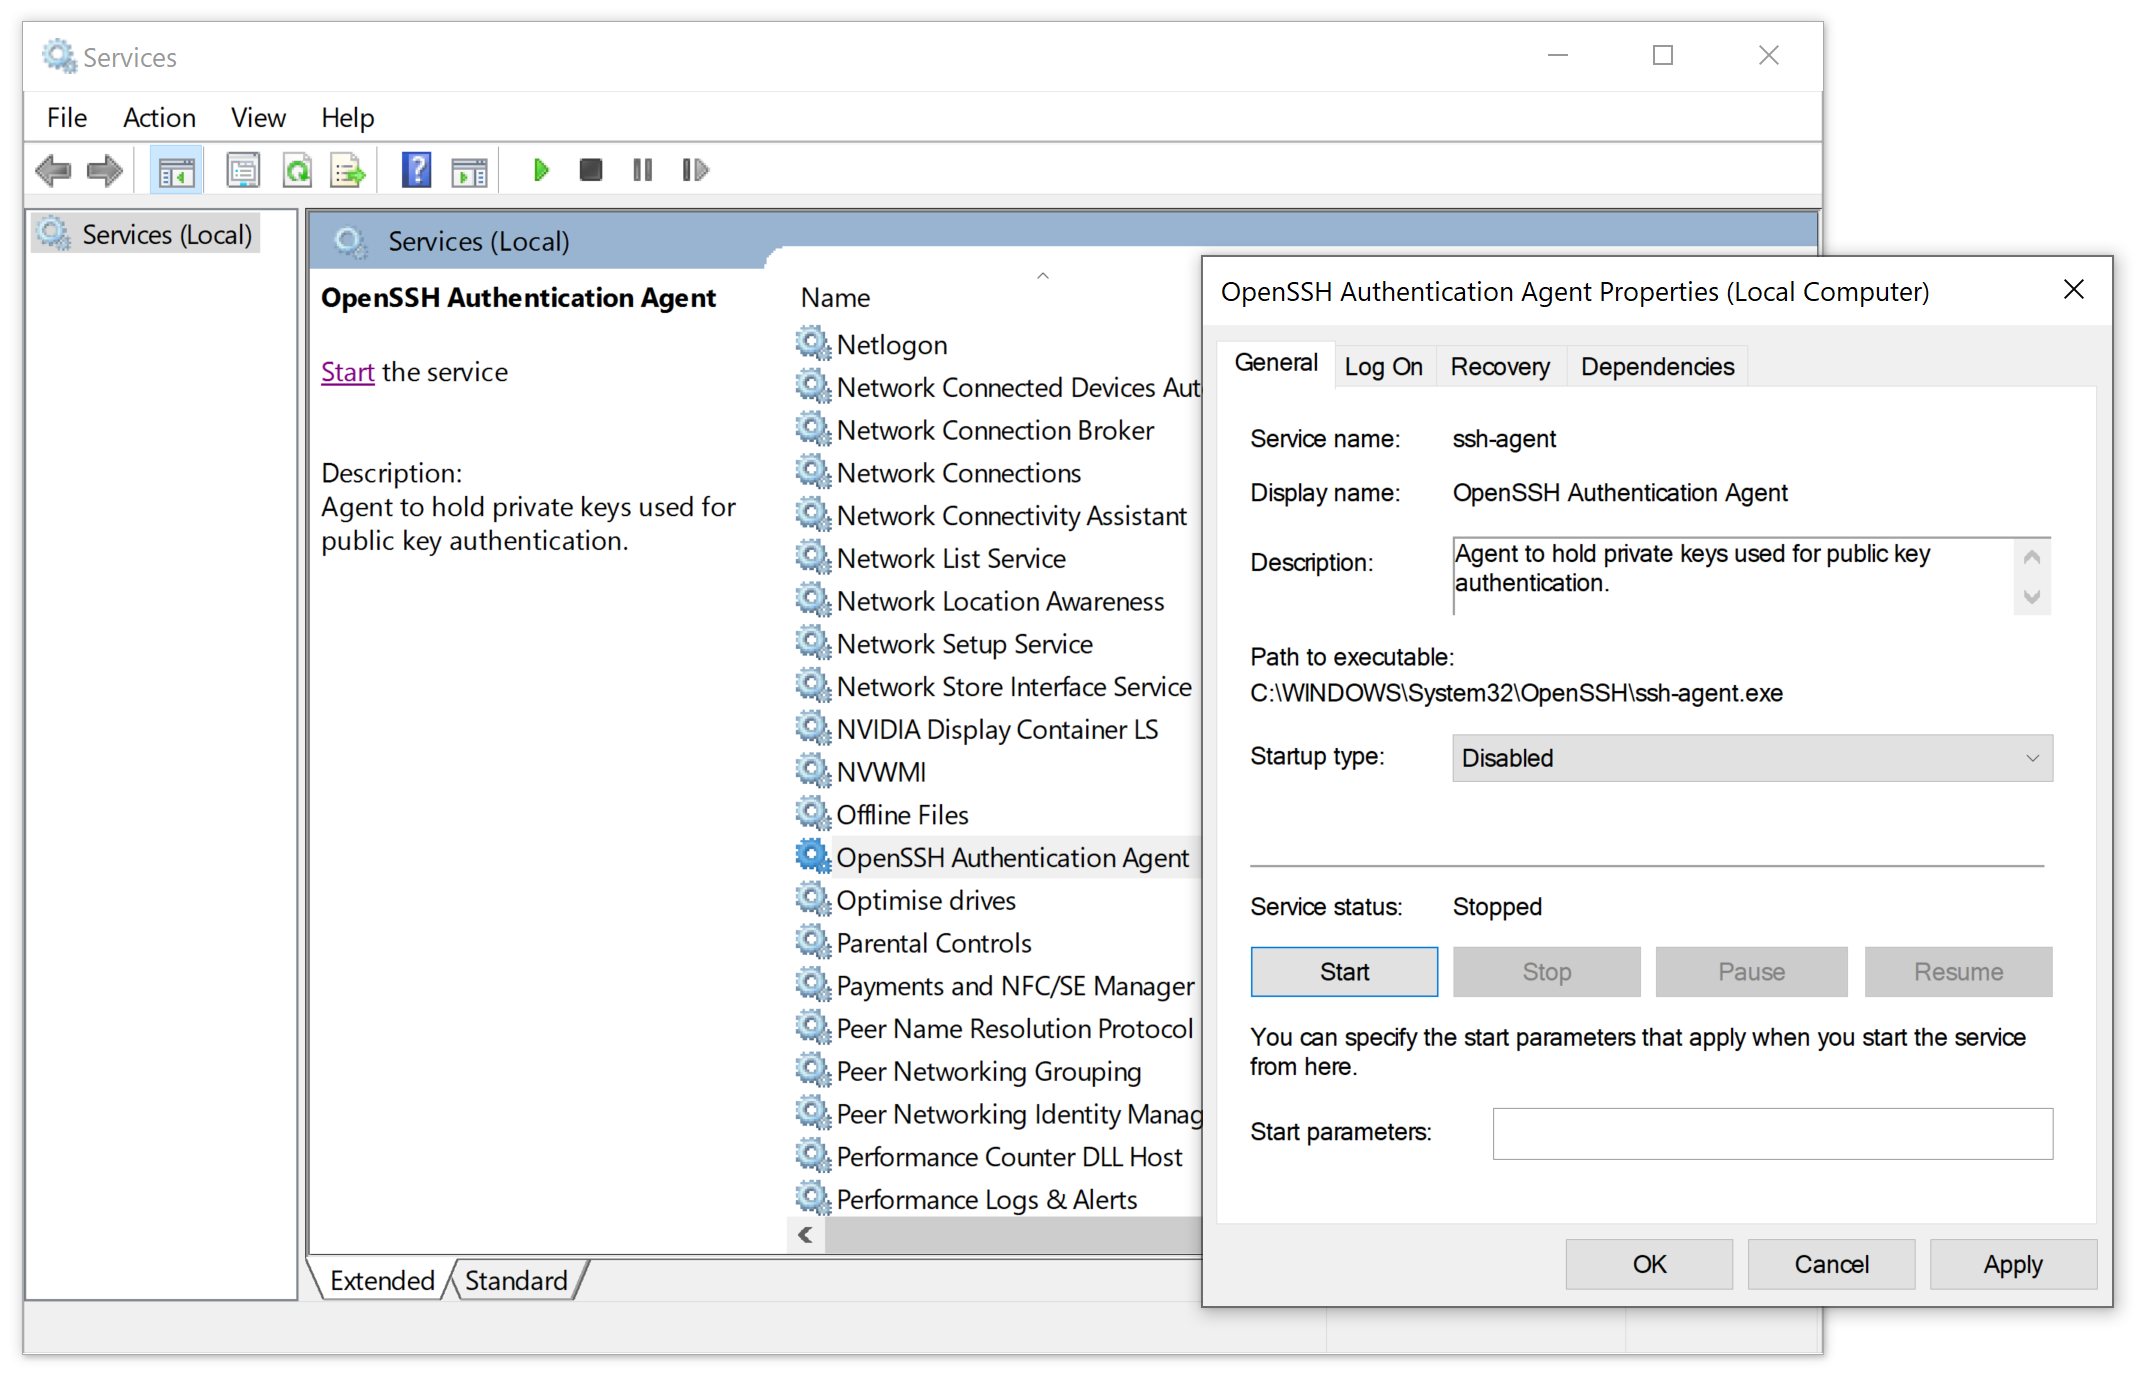
Check if the OpenSSH Authentication Agent service is installed and running
Before you can turn on the SSH agent in 1Password, you'll need to check if the OpenSSH Authentication Agent service is installed:
-
Go to Services > OpenSSH Authentication Agent (press Win + R on your keyboard to open the Run window, type
services.mscand press Enter or select OK). -
Look for the OpenSSH Authentication Agent in the list of services.
If you don't see the OpenSSH Authentication Agent in the list, skip ahead to the steps to turn on the SSH agent in 1Password.
If you do see the OpenSSH Authentication Agent in the list, continue with these steps to disable it from startup and make sure it's not running:
-
Select OpenSSH Authentication Agent in the list of services and press Enter.
-
In the "Startup type" menu, select Disabled. If the service status shows the agent is running, select Stop.
-
Select Apply > OK.
The 1Password SSH agent can then take over and listen on the system-wide pipe at \\.\pipe\openssh-ssh-agent.
Turn on the SSH agent in 1Password
Follow these steps to turn on the SSH agent in 1Password:
- Open the 1Password app, then select your account or collection at the top of the sidebar and select Settings > Developer.
- Select Set Up SSH Agent, then choose whether or not you want to display SSH key names when you authorize connections.
- (Optional) Adjust the authorization options for when and how often the SSH agent will ask you to approve SSH requests.
If you previously turned off the SSH agent and would like to turn it back on, select the checkbox to Use the SSH agent.
When you choose to display SSH key names when authorizing connections, it's easier for you to identify which key 1Password is requesting access to when authenticating a request from an SSH client. To display key names in authorization prompts, 1Password needs to save the titles of your SSH Key items in local storage. To turn off this feature, deselect the checkbox to Display key names when authorizing connections in the Security section.
To make sure the SSH agent keeps running, even when the 1Password app is closed:
- Open 1Password, then select your account or collection at the top of the sidebar and select Settings > General.
- Select the checkbox to Keep 1Password in the notification area.
- Open the 1Password app, then select your account or collection at the top of the sidebar and select Settings > Developer.
- Select Set Up SSH Agent, then choose whether or not you want to display SSH key names when you authorize connections.
- (Optional) Adjust the authorization options for when and how often the SSH agent will ask you to approve SSH requests.
If you previously turned off the SSH agent and would like to turn it back on, select the checkbox to Use the SSH agent.
When you choose to display SSH key names when authorizing connections, it's easier for you to identify which key 1Password is requesting access to when authenticating a request from an SSH client. To display key names in authorization prompts, 1Password needs to save the titles of your SSH Key items in local storage. To turn off this feature, deselect the checkbox to Display key names when authorizing connections in the Security section.
To make sure the SSH agent keeps running, even when the 1Password app is closed:
- Open 1Password, then select your account or collection at the top of the sidebar and select Settings > General.
- Select the checkbox to Keep 1Password in the system tray.
Step 4: Configure your SSH or Git client
After you turn on the SSH agent in 1Password, you'll need to configure your SSH client to use the agent for authentication.
- Mac
- Windows
- Linux
Add the IdentityAgent snippet to your ~/.ssh/config file:
If your ~/.ssh folder or config file doesn't exist yet, create it first.
You can also set the SSH_AUTH_SOCK environment variable in the shell where your SSH command runs:
For an agent path that's easier to type, you can optionally run the following command to create a symlink for ~/.1password/agent.sock:
Now your SSH clients will use the 1Password SSH agent for all hosts.
If you prefer to migrate to the 1Password SSH agent gradually, you can configure your SSH clients to only use the SSH agent for one or more specific hosts, instead of all hosts. Learn more about gradual migration.
Some SSH clients don't support every configuration option that the ~/.ssh/config file has to offer.
Learn more about SSH client compatibility.
By default, OpenSSH servers are configured to limit the amount of authentication attempts for an incoming SSH connection. Learn more about how to avoid the SSH server six-key limit.
Additional configuration to use the SSH agent for authentication with your SSH clients isn't required.
To use the SSH agent with Git, configure the core.sshCommand variable in your Git config to use Microsoft OpenSSH:
You can also manually edit your gitconfig file:
For the best Git experience with 1Password, install the latest version of Git for Windows (version 2.33 or later).
If you're using Windows Subsytem for Linux (WSL), you can use the 1Password SSH agent with WSL.
By default, OpenSSH servers are configured to limit the amount of authentication attempts for an incoming SSH connection. Learn more about how to avoid the SSH server six-key limit.
Add the IdentityAgent snippet to your ~/.ssh/config file:
If your ~/.ssh folder or config file doesn't exist yet, create it first.
You can also set the SSH_AUTH_SOCK environment variable in the shell where your SSH command runs:
Now your SSH clients will use the 1Password SSH agent for all hosts.
If you prefer to migrate to the 1Password SSH agent gradually, you can configure your SSH clients to only use the SSH agent for one or more specific hosts, instead of all hosts. Learn more about advanced use cases.
Some SSH clients don't support every configuration option that the ~/.ssh/config file has to offer.
Learn more about SSH client compatibility.
By default, OpenSSH servers are configured to limit the amount of authentication attempts for an incoming SSH connection. Learn more about how to avoid the SSH server six-key limit.
Step 5: Run a command
Now you're ready to start using the 1Password SSH agent with GitHub.
From your project directory, run:
If you don't have a project available on GitHub where you can run git pull now, you can run this command instead to quickly test your GitHub SSH setup:
Step 6: Authorize the SSH request
1Password will ask you to allow your terminal or other SSH client to use your SSH key. You can approve this request using the authentication option indicated on the prompt (for example, Touch ID, Windows Hello, or your account password). If 1Password is locked, you'll also be prompted to unlock the app so the SSH agent can access your private keys.
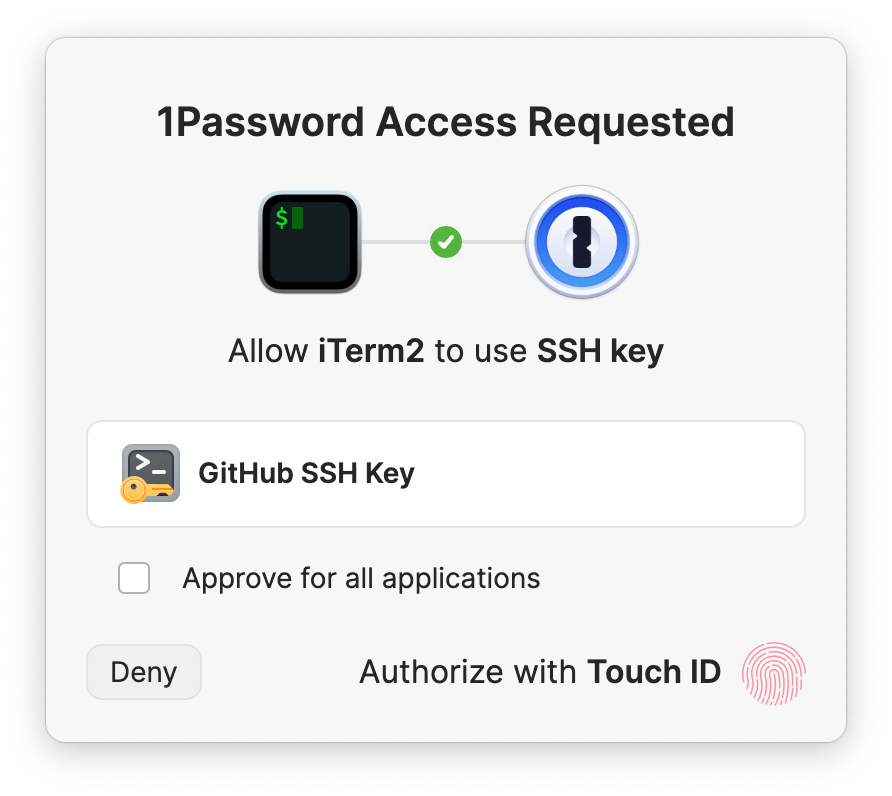
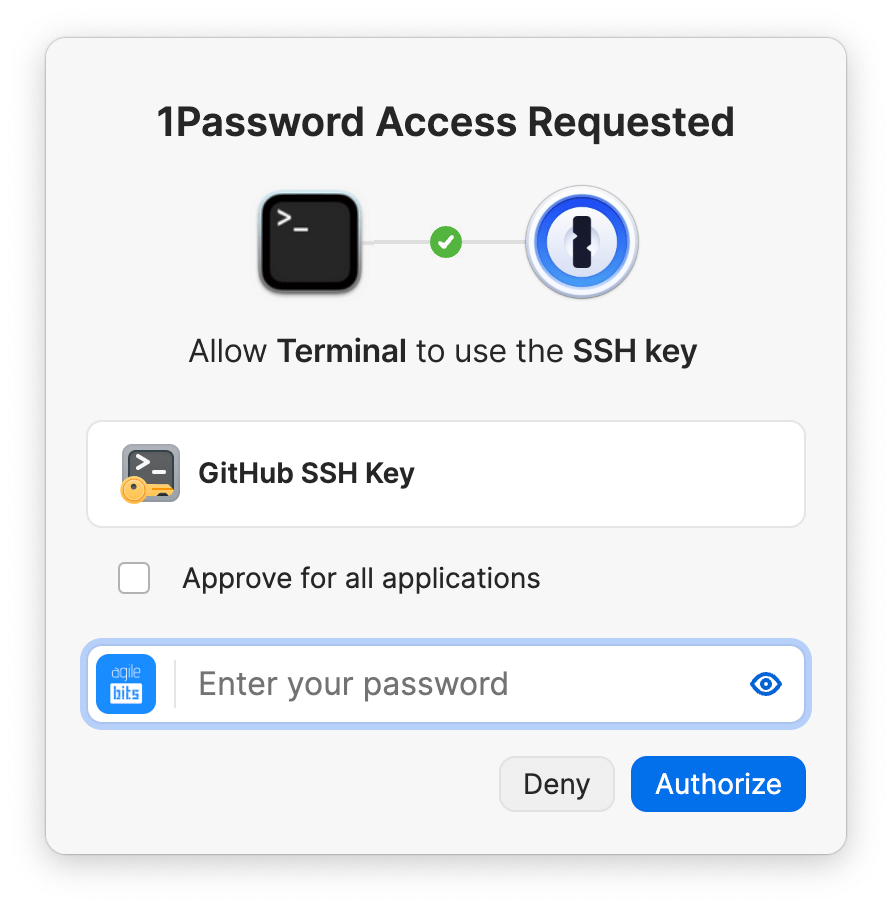
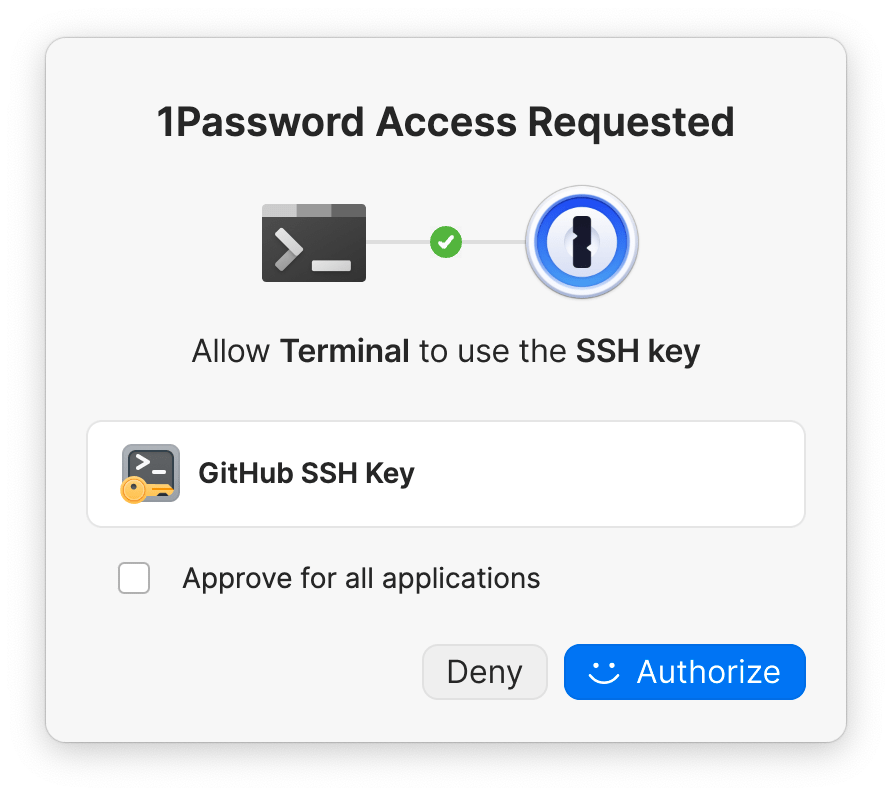
After approving the request, you can continue using the same SSH key for that application without being prompted again until 1Password locks or quits. You can also configure your authorization settings to prompt more or less frequently.
Learn more about the 1Password SSH agent authorization model.
Adjust your authorization options
There are several options you can choose from to determine how long the agent remembers your SSH key approval and what usage you're approving for each key. These options determine when the SSH agent will ask you to approve SSH requests.
In the 1Password settings
Open 1Password, then select your account or collection at the top of the sidebar and select Settings > Developer. In the security settings for the SSH agent, you can choose the options that best suit your needs. You can change your settings at any time.

1Password can ask you to approve an SSH request:
-
For each new application (default): You'll be asked to authorize SSH requests from each new application to use a specific SSH key.
-
For each new application and terminal session: Similar to the first option, you'll be asked to authorize SSH requests from each new application to use a specific SSH key. If the application is a terminal emulator or an IDE with a built-in terminal, you'll also be asked to authorize requests for each new terminal tab in that application.
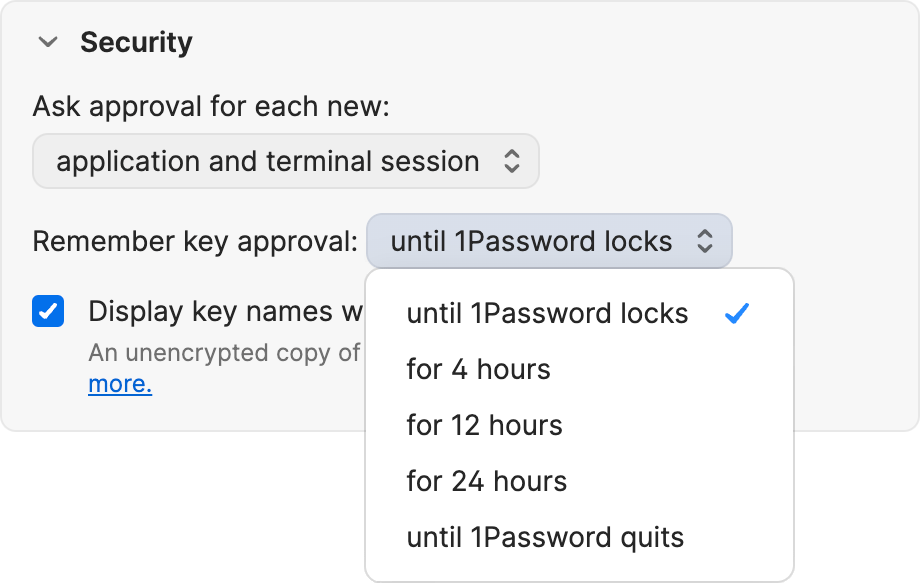
You can choose how long 1Password will remember your key approval.
-
Until 1Password locks (default): Every time 1Password locks, your key approvals are wiped from the agent's memory and you'll be asked to reauthorize any previously approved SSH clients to use your keys. For example, if you approve the terminal application to use your SSH key for GitHub, then 1Password locks, you'll need to reapprove any new requests from the terminal to use your GitHub SSH key when 1Password unlocks.
-
Until 1Password quits: Every time 1Password quits, your key approvals are wiped from the agent's memory. Any agent sessions and background processes will also end. To use the SSH agent to authorize any new requests to use your SSH keys, you'll need to reopen 1Password.
-
For a set amount of time: You can choose from 4, 12, or 24 hours. If you select one of these options, your key approvals will remain in the agent's memory for that duration, even when 1Password is locked. You won't need to reauthorize new requests from the same applications to use the same SSH keys you've already approved, but you'll be prompted to unlock 1Password so the SSH agent can access your private key.
In the authorization prompt
Every authorization prompt for a client to use an SSH key includes the option to approve the use of that key for all applications. To turn on this option, select the checkbox to Approve for all applications.
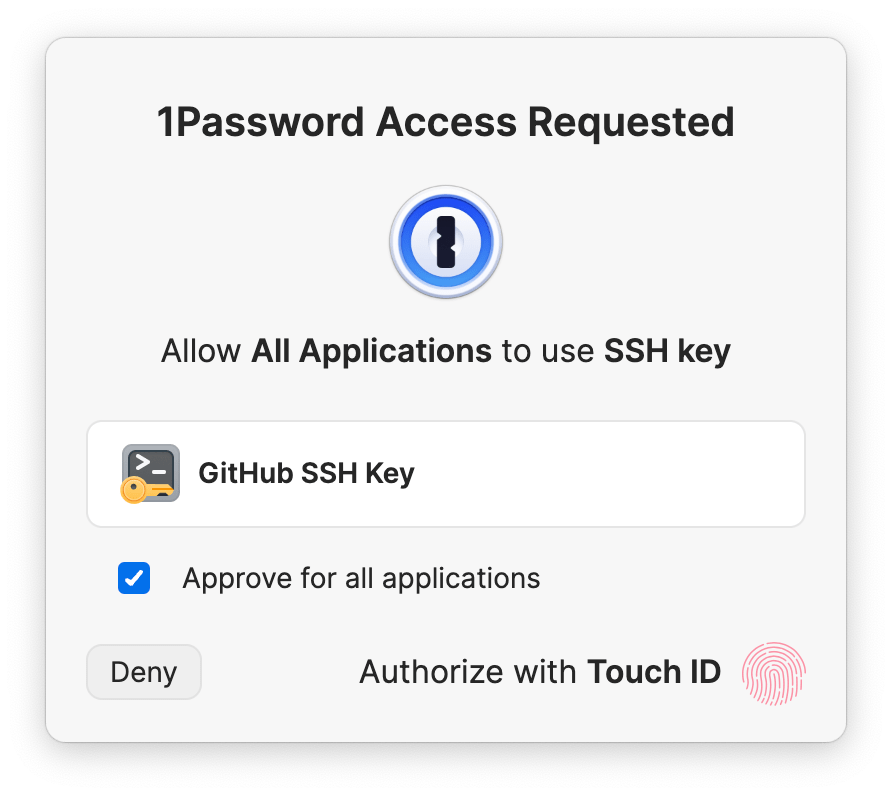
This option can be selected for individual SSH keys. It temporarily authorizes all applications running in the current OS user account on your device to use that SSH key for the duration of the agent session (depending on the options you've selected in the developer settings in 1Password). You can use this option alongside your other settings.
Learn more about the authorization options for the SSH agent.